Back to TheWorxHub for Senior Living Main Menu
Capital Planning Reporting
The Replacement Schedule report provides data that can assist you in evaluating your future asset replacement needs. The report can be filtered for a specific group of assets, with options for varying levels of detail.
How to Run the Replacement Schedule Report
- Click on Reports from the navigation menu, then click Assets.
- Select Replacement Schedule.

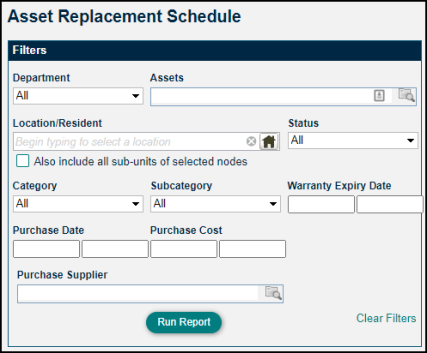
Filters
Use the optional filters to select the assets you would like included in the report. *Note: In order to have a broad range of results, we recommend limiting the number of filters used.
Department - Click the drop down menu and check the box next to each department that is needed.
- Assets - Click the search icon (
) to open the Select Assets window.
- Enter a search term in the Search field.
- Check the box next to each asset that is needed and click Select Assets.
- Location/Resident - Type and select the name of the location or click the Location Picker (
) and select it from the window.
- Check the Also include all sub-units of selected nodes checkbox to include data for all sub-units of a location.
- Status - Click the drop down menu and check the box next to each status that is needed.
- Category - Click the drop down menu and check the box next to each category that is needed.
- Subcategory - Click the drop down menu and check the box next to each subcategory that is needed.
- Warranty Expiry Date - Enter a beginning and ending date to filter the results based on the warranty expiration date.
- Purchase Date - Enter a beginning and ending date to filter the results based on the purchase date.
- Purchase Cost - Enter a beginning and ending amount to filter the results based on the purchase cost.
- Resident Owned - Click the drop down menu and select the owner of the asset.
- Purchase Supplier- Click the search icon (
- Enter a search term in the Search field.
- Select the supplier or contractor that is needed and click Select.
- If you would like to remove the selected filters, click the Clear Filters link.
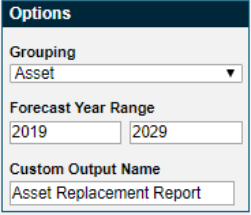
Options
- In the Grouping drop down menu, choose how you would like the data to be organized. The option selected determines the level of detail in the report results.
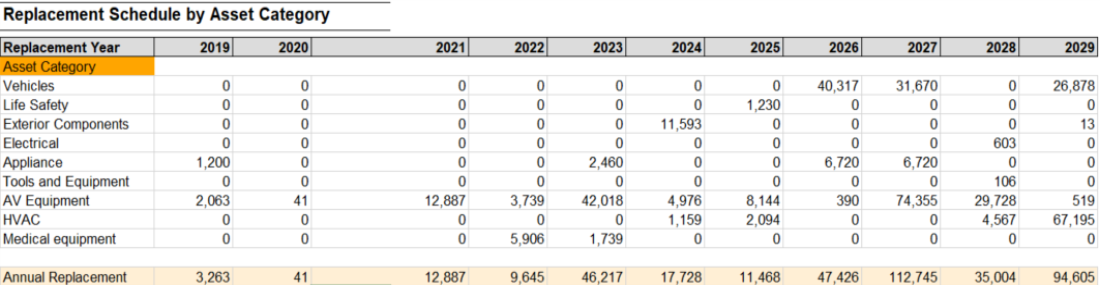
- Category - This grouping generates a roll-up summary of your replacement costs broken down by category. *Note: We recommend this option when reporting future replacement costs to your C-suite in a concise format.
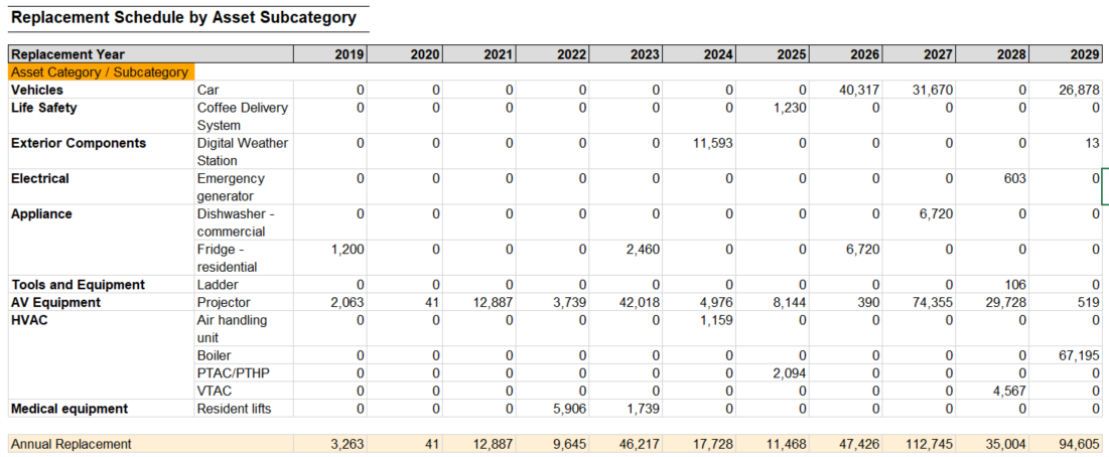
- Subcategory - This grouping offers a more detailed view of your replacement costs. Each category is broken down by subcategory. The total cost for all assets is listed for each Replacement Year.
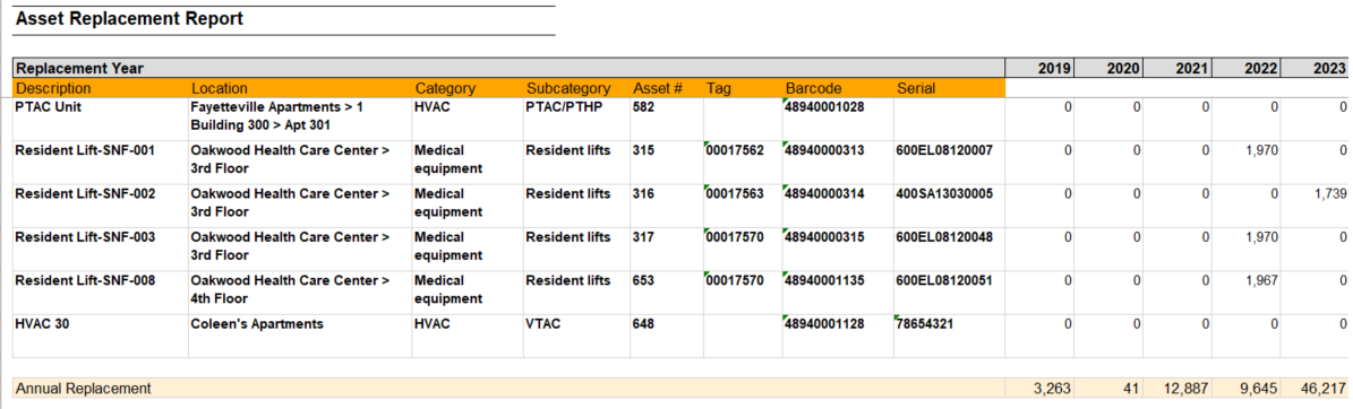
- Asset - This grouping provides a detailed listing of your assets based on the filter criteria. It includes information such as the Description, Location, Category, and the annual replacement cost for each asset. The total cost for all assets is listed for each Replacement Year. *Note: We recommend using the Asset grouping when a high level of detail is needed. This option is ideal when evaluating your replacement costs using Excel’s data analysis tools.
- The Forecast Year Range determines the report results based on the selected forecast period. *Note: This range will automatically default to ten years starting with the current year. It can be changed by entering a beginning and ending year for the new forecast period.
- If you would like to enter a custom name, enter the report title in the Custom Output Name field.
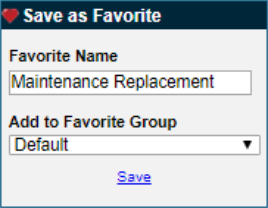
Save as Favorite
- To save the report as one of your favorites, enter the title of the report in the Favorite Name field.
- To assign your report to a group, select the group name from the Favorite Group drop down menu.
- Click Save.
- Click the Run Report button. The report will be generated as an Excel spreadsheet.
